
A workshop shipping container garage is a standard steel shipping container that has been converted into a functional workspace or garage for tools, repairs, and projects. Instead of building a traditional garage, you use a container as the main structure, then modify the inside to suit your work.
It is mainly used for mechanical work, woodworking, metal fabrication, or tool storage and repair space. The key is planning for structure, comfort, power, and workflow. Here’s how to do it right.
Not just because they’re trendy, but because they solve a lot of practical problems at once. Here are the tips on turning a used container into a workshop shipping container garage!
Contents
The Advantages of Containers as Garage Workshops

Built Tough & Long-Lasting
Made from corrugated steel, a shipping container is designed to survive harsh ocean transport. Therefore, they are resistant to rain, wind, pests, and impacts.
Compared to wooden sheds, containers are far more rugged. They can last decades with minimal maintenance.
Excellent Security
One of the biggest advantages of using a shipping container as a workshop garage is security. These units were originally built to protect valuable cargo across oceans, so they are naturally tough to break into.
Made from thick corrugated steel, it is resistant to cutting, prying, and impact. Breaking into a container takes serious effort, tools, and time.
Moreover, it has an industrial locking system that consists of vertical locking bars secured to double doors, multiple locking points, and lockboxes.
Cost-Effective Setup
One of the biggest reasons people choose a container workshop is cost efficiency. When buying a container, you get a solid, secure structure without the expense and time of building a traditional garage. Moreover, it will be even cheaper if you buy a used container.
No need for bricks, roofing, or full construction crews, as setup can be done in a single day. This will save heavily on labor and materials.
Portable & Flexible
One of the most unique advantages of a container workshop garage is that it’s not fixed in one place. You can move it, adapt it, and reconfigure it as your needs change. The entire workshop can be transported by truck or crane. This is ideal for renting land for temporary projects or changing job sites.
Moreover, the unit placement is also flexible. You can install the workshop shipping container garage on bare soil, gravel, or concrete blocks, as no permanent foundation is required.
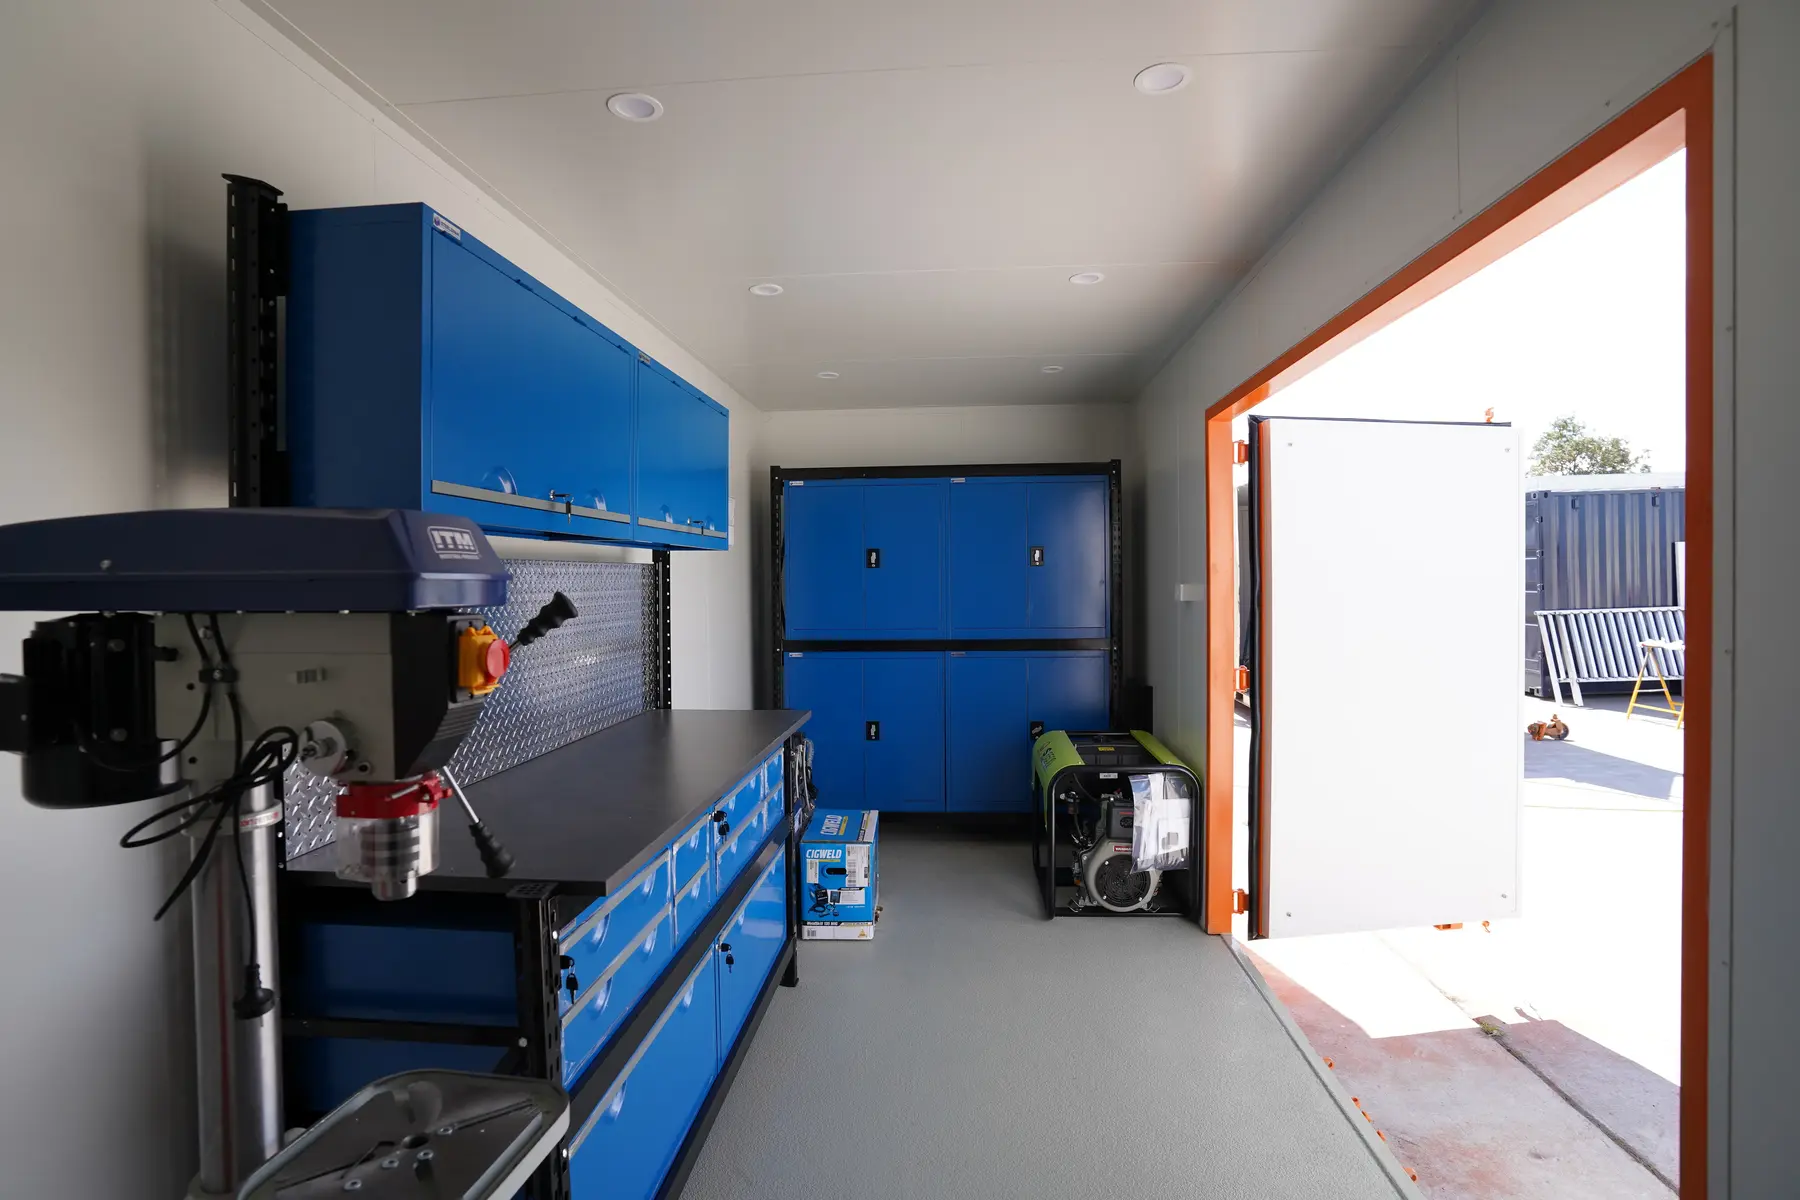
Customizable Interior
With a shipping container, you can customize the interior all you want with workbenches, tool walls, electrical systems, and ventilation. You are free to use this for woodworking, automotive work, and fabrication.
Compact & Space-Efficient
A shipping container workshop can be space-efficient. Instead of wasting space like in large garages, every area is used with a purpose. It fits into tight spaces where a normal garage won’t, making it ideal for small properties, backyards, and narrow land plots.
Limited space pushes you to declutter, keep only essential tools, and organize efficiently, which results in a cleaner, more productive workspace.
Weather Resistance
Designed to be water-tight and windproof, a workshop shipping container garage can keep tools safe from humidity and storms if you add proper sealing. It works well in tropical climates with added ventilation.
Fast Installation
One of the biggest advantages of a container workshop is how quickly it can go from delivery to usable workspace. Often, in just a day or two, it is ready to use, as it will be delivered as a complete structure.
The container already has walls, a roof, a floor, and doors. Moreover, it requires minimal site preparation, no deep foundation, or complex construction.
Tips on Turning a Container into a Garage Workshop

1. Start with the Right Container
Choosing the right container is the most important first step. A good container choice saves you money, effort, and future problems. A bad one creates constant headaches.
In this step, you need to pick the right container size. The 20’ container is considered compact, easier to place, and good for small workshops or limited space. Meanwhile, the 40’ can provide more room for tools and movement, but it costs more. If you can afford it and have space, 40’ is usually the better long-term choice.
Also, consider the high cube container, as its extra height makes the space feel less cramped and allows overhead storage.
2. Plan Layout & Workflow
In a container workshop, layout isn’t just about where things go. It determines how efficiently and comfortably you can work. With limited width, smart planning is everything.
When laying out your container workshop, divide zones into workbench area, tool storage, and machine space. Even in a small container, zoning prevents chaos.
A one-sided layout is a game-changer. If using this layout, you need to place the workbench & tools along one wall and keep the opposite side as a clear walkway. This avoids the “cramped tunnel” feeling and improves movement.
3. Electrical Setup (Critical)
A proper electrical setup turns your container from a simple box into a fully functional workshop. Done right, it gives you safe, reliable power for tools, lighting, and future upgrades.
Before installing anything, decide what tools you’ll use, total power needed, and number & location of outlets, to prevent overloads and messy wiring later.
Also, install a dedicated breaker panel by using a small distribution board inside the container to separate circuits for lighting, general outlets, and heavy tools. This will improve safety and make troubleshooting easier.
4. Insulation & Ventilation
This step is essential, as containers trap heat and moisture. Without insulation and ventilation, your container becomes hot, humid, and uncomfortable. The best insulation option is spray foam. It will expand to seal gaps, block heat, and prevent condensation.
Insulation is better supported with ventilation. The key goal of ventilation is to move hot air out of your workshop shipping container garage. For the ventilation, you can choose between passive vents, turbine roof vents, electric exhaust fans, and windows for cross airflow.
5. Doors, Access & Security
Doors and access determine how easy it is to work and how secure your tools stay. You can start with the original ones, double cargo doors. They provide a wide opening for large tools, but it’s not convenient for daily entry.
Therefore, you need to install a side man door for daily use. This will save time and avoid opening heavy main doors constantly. You can also upgrade to a roll-up or side door for easier access.
6. Interior Build-Out
The interior build-out is where your container transforms from a metal box into a functional, comfortable workshop. This step defines how efficient, durable, and enjoyable your workspace will be.
First, you need to frame the Interior with wood studs or light steel framing to create clean wall surfaces and make installation of wiring and panels much easier. Then, install insulation and wall panels. This will give you better temperature control and surfaces to mount tools and shelves.
7. Safety First
A container workshop is strong and compact. But that also means risks like heat, fumes, and electricity can build up faster. Therefore, you need to prioritize safety early to protect yourself and your equipment.
Things to Consider
Heat Buildup
Heat buildup is the number 1 problem with shipping container workshops. The steel structure acts like an oven if not treated properly. Here’s what’s going on and how to fix it effectively.
Containers get so hot as they absorb solar heat quickly. Under direct sun, the interior temps can exceed 122-140°F.
The most effective solution is to add insulation and ventilation. Spray foam is the best insulation option. It seals gaps, blocks heat, and prevents condensation.
Limited Width
The limited width of a shipping container is one of the biggest design constraints when turning it into a workshop. However, it is manageable if you plan smart.
A standard container width is 8’. After insulation + walls, the space will get tighter. This will make it challenging to fit large machines.
The smart way to overcome the width limit is by using a one-sided layout. With this layout, you can put the workbench and tools on one side only, then leave the other side as a clear walkway. This instantly makes the space feel bigger and usable.
Shipping Container Workshop Maintenance
A shipping container is made of steel, making it durable and resistant to harsh conditions. This makes them naturally low-maintenance, especially when compared to traditional wooden or brick-and-mortar workshops. Mostly, what you need to do to keep the excellent conditions of your art & craft shipping container workshop is basic cleaning, some seal replacements, and occasional paint touch-ups.
A shipping container is also weather-resistant, so you just have to add security measures to your container to make it harder to tamper with and prevent break-ins for the rest. What’s more, shipping containers have an average lifespan of 25 years thanks to a design that ensures their durability during sea travel. After manufacturers modify cargo containers and transform them into container-based structures, the container’s longevity remains.
Conclusion
A container workshop gives you strength, security, lower cost, flexibility, and quick setup.
In the search for cheaper ways to create a workshop, modifying shipping containers has become more popular than ever. While shipping containers are used mainly for long-distance goods transportation, they are actually much more versatile as an art & craft workshop.
You can get your own 10, 20’, 40’ containers from Tradecorp immediately as soon as you need them. Fill out the quote form immediately to be contacted by our salesperson.